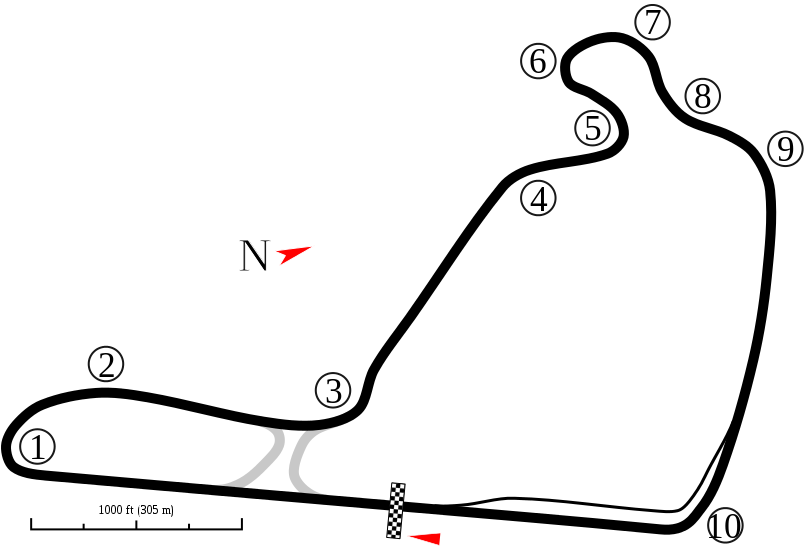
Summit Point Main is a 10-turn, 2.0-mile (3.2 km) road course that features a 2,900-foot (880 m) main straight. This original circuit opened in 1970. - Learn more on: Wikipedia
NOTE: This is a dynamic page, if this page is not displaying any data, please use the TRACK GUIDE menu to reselect this venue!
| Travel Guide | Turn-by-Turn |
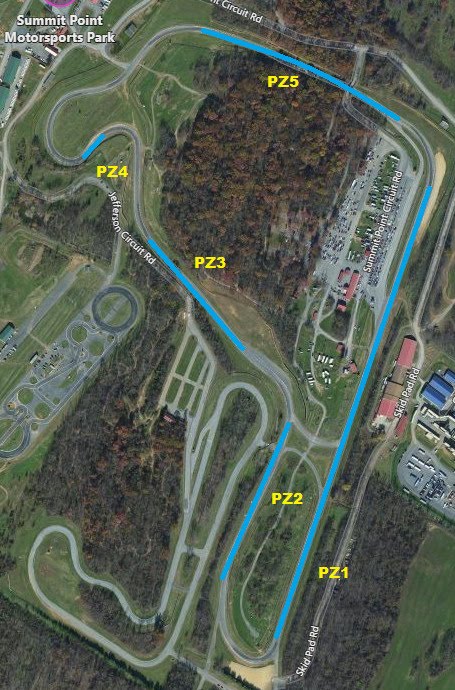
Passing Zones
Note: All passing zone data depicted below is based on "advanced driver" rules, if you are in a different run group please consult your organization or chief instructor for passing zones that are appropriate for your run group.
Turn-by-Turn (Front Half)
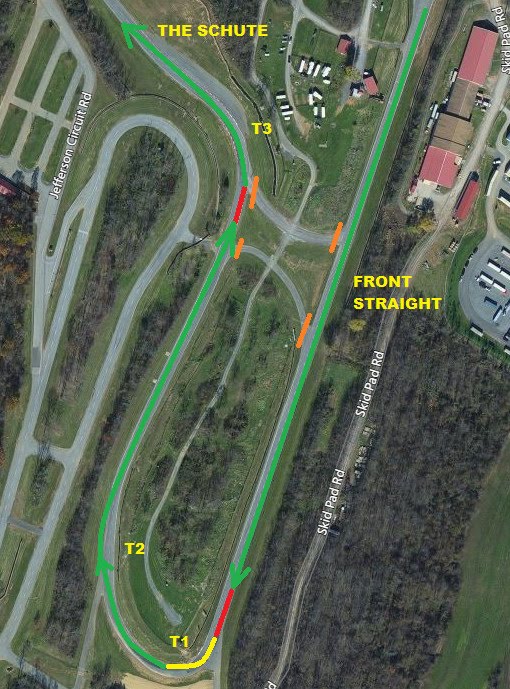
- Turn 1: This is a slow right which is also fairly long. There are at least three different possible lines through it:
- The "standard" line: follow the painted line on the left edge of the track through the braking zone until the turn in point, but do not cross it. Turn in from that painted line, hit the apex which is a late one due to the length of the turn, and track out.
- The "wide" line: there is a pavement extension past the braking zone on the left. Different cars and drivers use a varying amounts of it, but the car moves left over the painted line into that pavement extension after the 1 brake marker before turning right into turn 1. This makes the turn geometrically wider but also makes the initial turn in sharper. Higher horsepower cars and novice drivers seem to prefer the wide line. Personally I am not convinced that it offers more than it costs.
- The "trailbraking" line: because the turn is actually quite long, the car cannot accelerate until it clears the late apex. Instead of following the painted white line on the outside until turn in, turn slightly earlier and trailbrake into the turn, roughly until the apex. This makes the line sharper at the apex but increases the average speed through the turn in portion. I think this is the fastest line, if the car can hold it.
New pavement notes: the concrete apex curb is now much more usable than before, and is probably beneficial for lap time even though it does unsettle the car a bit. The various entry line options are likely to remain, being more of a function of the car's grip and stability that surface grip.
- Turn 2: The track continues to curve after turn 1, and that bend is turn 2. In most cars turn 2 is taken flat out. Cars with a low grip to power ratio should feed increasing amounts of throttle with the goal of being flat out somewhere mid track between the apex of turn 1 and the the pavement extension on the left (see below). Cars with medium to low horsepower and good grip are likely to benefit from the trailbraking line into turn 1 and run a late enough apex that they can be flat out from the apex of turn 1 through the entire turn 2. Look for the end of the pavement extension on the left, where an access road is, as you are passing the apex - that is the track out point. There is a "pothole" where the pavement ends, so be careful not to drop a wheel there.The car should be positioned track right as soon a turn 2 ends, and follow the right edge of the track the entirety of the straight between turns 2 and 3.
- Turn 3: Fast uphill left, which is partially blind. I think the track narrows a bit past the apex which would make this turn a somewhat late apex, except it is also an uphill which makes especially lower horsepower cars lose speed through it, which in turn makes it into an earlier apex. The turn in point is approximately where the second access road on the right begins. The faster you go, the earlier the turn in point is. Most novice/low intermediate drivers turn in too late and take the turn too slowly. In a car which is set up to slightly understeer at speed you should be on power through most of the turn, and definitely from the apex forward. Follow the inside edge of the track for about 3 feet around the apex.This turn is quite fast and requires a good amount of confidence. Novice and intermediate drivers tend to be way under the theoretical maximum speed there. There is a large amount of time available in the turn itself, and higher exit speed helps on the 3-5 straight as well.New pavement notes: The flatness of the entry should permit a more aggressive entry, and the new pavement makes this turn faster as well. Apex curb should be used to increase effective turn radius, and should absolutely be cut if turning in a bit too early. The entire exit curb including the recently added extension is usable, and I found myself using it more frequently due probably to a more consistent entry speed due to the flattening of the bumps around turn in.
- Turn 3-4 "HILL": A common issue is drivers lifting off power before the crest of the hill prior to turn 4. In just about any car the crest should be taken under power, and if you need to brake for turn 4, the braking should be performed on the downhill past the crest.
Turn-by-Turn Information provided by![]()
©2018 - Oleg Pudeyev / Race & Track Driving ; with Permission.
Turn-by-Turn (Back Half)
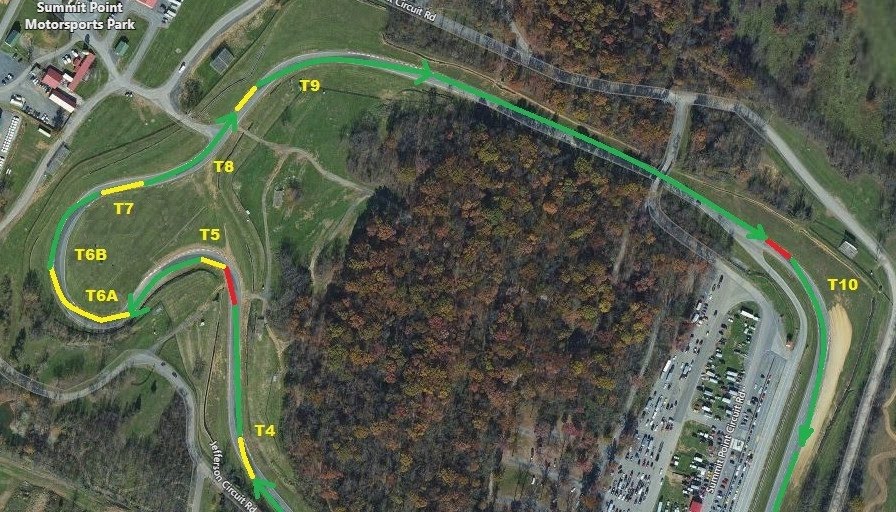
- Turn 4: A fast downhill right. Similarly to turn 3, novice and intermediate drivers do not carry enough speed through turn 4. You should start out with a late apex, positioning the car on the right edge of the track for the entire duration of the braking zone into turn 5. Then experiment with tracking out more and transitioning from left to right later.Low power cars like Miatas can take turn 4 under full throttle with the right line, even on street tires.Turn 4 should not be early apexed.Stay off the apex curb there as well as it unsettles the car too much.New pavement notes: The additional grip provided by the new pavement makes turn 4 a full throttle corner in more vehicles now. The turn is easily taken under full throttle by Miatas on extreme performance street tires like Bridgestone RE-71r, whereas previously an R compound tire in good condition was required to accomplish the same feat. Using the apex curb is probably still not advantageous, though cutting it is not as big of an issue as it was prior to the repave as it's now not as tall compared to asphalt level.
- Turn 5 "BRAKING ZONE": Prior to the repave the braking zone was a special feature of Summit Point. With the new pavement being uniform in grip the braking zone is no longer unique in how it drives, however the higher exit speeds from turn 4 mean earlier braking going into turn 5.A good starting line is to track out to track center from turn 4, hit the brakes while staying track center between turns 4 and 5, and enter turn 5 from track center.
- Turn 5: A slow left at the bottom of a hill, with not much paved runoff. Easy spot to go off track in non-ABS cars. People also tend to spin at the exit of turn 5 when driving high horsepower rear wheel drive cars.As part of the repave, the apex curb in turn 5 was replaced with the same concrete type curb as found in other corners around the course. This combined with the raise of the asphalt level means the old strategy of rotating the car with the apex curb no longer works. The corner now drives as a standard slow corner, and it is my opinion that the widest possible entry is presently the best.I suggest entering turn 5 around track center and trailbraking into it, though running a later apex than what was previously possible with the old curb. The apex should be about 3/4 of the way into the corner. Use the entire track width on the exit as before.For the sake of historic interest, prior to the repave there were at least two popular lines through turn 5:
- The "standard" line has the turn in point on extreme right, executes a normal apex and tracks out to about mid track before going back left to set up for turn 6.
- The "trailbraking" line starts mid track or slightly right of center at approximately the half way point between turns 4 and 5 and runs diagonally toward the apex of turn 5, with braking being performed all the way up to and possibly through the apex. The goal of this line is to put the car on the transition between the pavement and the curbing on the inside approximately 2-3 feet prior to the apex, and follow that seam through the turn. When executed correctly, the seam will rotate the car into the turn. When you are learning this line, place the car further into the curb until you feel the transition, then stay in the seam until well past the apex.
I will leave these lines here for reference while the new pavement is still relatively new, in terms of hours spent driving it.
- Turn 6: A slow right, faster than turn 5 but not by much.At novice and intermediate levels, this is a throwaway turn. For competitive driving you will want to use data to determite if a trailbraking line toward the apex similar to turn 1 and 5 lines, a "standard" line or a late apex line is the fastest.In low power cars the back straight effectively begins in turn 6, hence the correct line through turn 6-9 complex - one that avoids lifting - is crucial to lap time. Once the car is at full throttle from turn 6 to turn 10 pay attention to tire scrub and distance traveled, as they can influence the lap time significantly as well.New pavement note: With the added grip from the new pavement it becomes possible to drive a variety of wrong lines through turns 6, 7 and 8 - prior to running out of track in turn 9. On the old pavement the car would have difficulty fitting into the track between turns 7 and 8 if the line was not correct. The new pavement delays the problem until turn 9 when the car is also traveling significantly faster. Line precision through turns 6 through 8 is still important, even in low power lines, and it can be more difficult to recognize the wrong lines early in this section especially for less experienced drivers.
- Turn 7: A faster still right.This is a late apex turn and it begins the setup for turn 9. Come out of it on the right edge of the track to set up for a late apex in turn 8.New pavement note: Cars which previously required a lift to rotate into turn 7 may find themselves able to take turn 7 under full throttle on the new pavement. This means the back straight for such cars now would begin in turn 6, increasing the importance of correct line and good entry speed in that corner.
- Turn 8: An even faster left.Same as turn 7, this turn is a late apex in preparation for turn 9. Come out of it on the left edge of the track.
- Turn 9: A fast right leading onto the second longest straight. Exit speed is paramount. Because the turn is uphill, lower horsepower cars especially need good entry speed.This turn should be taken with a sufficiently late apex to be on power at least from the apex forward, and before the apex if possible.Lower horsepower cars take turn 9 flat out.High grip to power ratio cars can try a diagonal line through turns 8 and 9 instead of late apexing those turns.New pavement note: The bump around the apex of turn 9 that is often a source of complains from some high power car drivers should be less pronounced on the new pavement, or possibly gone completely. Given the higher grip in turn 6-8 complex, high power cars should be going faster through turn 9 which means they would likely need a lift to get the car to rotate into turn 9, coupled with running a later apex.
- Turn 9-10 "HILL": Aim to crest the hill in the middle of the track, where the white dashed line is painted. You should not follow the white line itself for any distance; rather, the car should travel in a straight line from extreme left as it exits turn 9, to track center over the crest, back to extreme left to enter turn 10.A common issue is drivers lifting before the crest. As with turn 4, the crest should normally be taken under power. The braking zone for turn 10 typically starts where the pit road splits from the course.
- Turn 10: A fast 90 degree right linking back straight and front straight.This is the most important corner on the track as it leads to the longest straight.Being a 90 degree turn, it is one of very few corners on road courses in Northeast where the line is close to an actual circle, as is drawn in novice classrooms.As with turn 9, exit speed is paramount. Most novice/intermediate drivers overslow for turn 10. As with turns 3 and 4, confidence in the car and one's driving ability is required for taking turn 10 at respectable speeds.Lower horsepower cars tend to need all the entry speed they can keep because they simply do not accelerate much between turns 10 and 1. Higher horsepower cars should put a premium on exit speed.If you run wide at turn 10, you definitely want to go off with the wheels pointed straight.
New pavement note: As with turn 3, the apex curb in turn 10 is now usable and likely beneficial for lap time. The higher pavement grip on the entry makes turn 10 easier to drive, although for the best lap time it still needs to be attacked aggressively.
Turn-by-Turn Information provided by![]()
©2018 - Oleg Pudeyev / Race & Track Driving ; with Permission.